Spreader Calibration Made Easy
Spreader calibration is important to ensure you are putting down the right amount. You may have your fertility program completed and know the exact amount you want to apply, but if your spreader is not calibrated, you may be putting down the wrong amount.
It is not hard and I will show you a couple of methods to choose from.
Choosing Between a Drop Spreader and a Broadcast Fertilizer Spreader
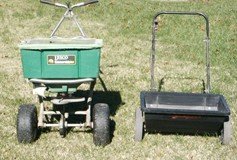
There are two types of fertilizer spreaders for home use. The rotary spreader and the drop spreader. Both have advantages and disadvantages. If you haven't purchased one yet, or if you plan on buying another one, we offer a look at the strengths and weaknesses of both types.
The Rotary Spreader Pros and Cons
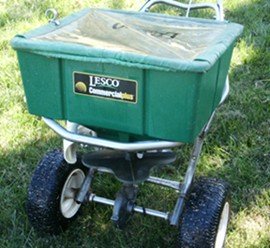
A rotary spreader, also called a broadcast fertilizer spreader, broadcasts material in a half circle pattern in front and to the sides of the spreader.
When the hopper is opened, fertilizer drops onto a spinning disk positioned directly under the hopper. The disk spins when the spreader is being pushed, throwing the fertilizer is a specific pattern.
The width of the spread pattern will depend on spreader design and how fast you walk.
Advantages: There are two primary advantages of this spreader. The first advantage, is that you can cover a lot of area quickly because of the width of the spread. The second advantage is that you usually don't get the streaks that often occur with drop spreaders. Broadcast fertilizer spreaders are the most often used type for large areas.
Most of the fertilizer will fall within the first three-quarters of the broadcast diameter. The outer edges of the broadcast range will be the thinnest, so the outside edge will be overlapped during the next pass. These broadcast fertilizer spreaders are more forgiving than drop spreaders. Most commercial spreaders are the broadcast type.
Disadvantages: A broadcast fertilizer spreader is not as precise as a drop spreader. You could broadcast fertilizer into water gardens, and onto driveways or sidewalks. Some broadcast spreaders have a shield that covers one side of the disk. It is not perfect, but when the shield is in place, it keeps most of the material from spreading on the covered side. There are tricks that can be learned with experience that will make these spreaders more accurate.
The Drop Spreader Pros and Cons
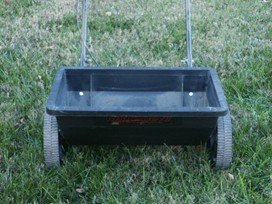
A drop spreader, as the name sounds, drops fertilizer directly under the spreader when the hopper is opened. It takes some practice to be able to cover a lawn completely without missing anything. When the hopper is opened, fertilizer drops directly onto the grass. When you make the next pass, care must be taken to make sure there are no gaps between rows or you will get streaks in your lawn. The drop spreader seen in the photo was given to me by a homeowner. He was so frustrated by all the streaks that he threw it into the back of my truck never wanting to see it again.
Advantages: Drop spreaders are more precise in terms of where you want the fertilizer to go. When fertilizing the edges of flowerbeds, water gardens, etc., the drop spreader can be a better choice. A couple passes around the garden, then if you want, you can switch to a rotary spreader.
Disadvantages: It can take skill to use properly. It is really only best for small areas or where precision is needed. You can use a drop spreader on a large lawn, but it will take much longer. The most common complaint with drop spreaders is how much care must be taken to make sure you are walking straight. Swerving or leaving spaces between rows will cause discoloration where some parts are fertilized and other parts are not.
Instructions for Spreader Calibration
Spreader calibration is easy when you follow a few simple instructions. The first step before attempting spreader calibration is to make sure your spreader works properly. Check to make sure the hopper opens and closes properly and all moving parts are working as they should. If they are not working properly, you should try to fix them or consider purchasing a new spreader.
I will give you two methods. The first spreader calibration method requires very little math. The second spreader calibration method is faster and easier, but requires the use of simple math. The formula, however, is easy and fully explained, so no worries.
1. Spreader Calibration Without Math
Fertilizer programs are based on a certain number of pounds of fertilizer for every 1000/sq.ft. So, begin by measuring an area of lawn 1000sq.ft.
The area of 1000 sq ft could be:
20ft X 50ft
25ft. X 40ft
10 ft. X 100ft
or anything that equals 1000sq.ft. You can use two smaller areas that equal 1000sq.ft. if you need to. If your area is small, you could measure 500sq.ft. and multiply the results by 2.
Check to see how much the fertilizer bag or your fertilizer plan says to apply per 1000sq.ft. (If a 25 lb bag covers 5000 sq.ft., you would need 5 lbs for 1000sq.ft.) For this example, we will use 5 lbs as the amount needed to apply.
(1) You will need to measure out 5 lbs of fertilizer. Always measure out a little more fertilizer than you need. The extra fertilizer will make sure it keeps flowing accurately as you get down near the bottom. A total of six lbs is a good round amount to measure out.
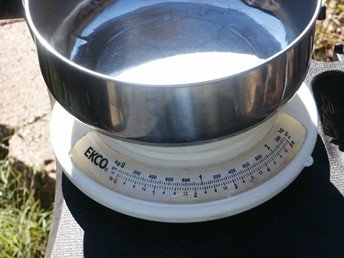
The scale I use is an inexpensive food scale, purchased at Wal-mart and cost about $5.00. The scale will measure up to five pounds. This model allows you to place the bucket on the scale and then readjust the scale back to zero. This way you adjust for the weight of the bowl and are only weighing the fertilizer.
(2) After placing the measured amount into the spreader, begin walking the test area. Open the spreader as you start walking and close it the second you stop walking to prevent the fertilizer from pooling on the ground. Note: Your spreader may have come with a sheet giving approximate spreader openings and application amounts. The fertilizer bag also lists settings for popular spreaders. If none of these apply, you will have to guess at the opening size.
(3) When you have finished spreading the fertilizer over the 1000 sq. ft., measure the amount you have left. If you have only one pound left, (you started with 6 lbs.) it is calibrated accurately for 5lbs per 1000sq.ft. If you have less than one pound, you are using too much and the spreader openings need to be closed more. If you have more than one pound, you are using too little and the spreader openings need to be opened a little more.
If you measured out 500 sq.ft. as the test area, then multiply the amount of fertilizer used by 2. This will give you the amount for 1000sq.ft.
You may need to repeat the test if it was way off the mark. You will need to measure off a new area. Don't test over the same area.
2. Spreader Calibration Using Math
Using math for spreader calibration reduces the amount of work and effort needed for accurate results.
(1) Weigh out a specific amount of fertilizer. To use the example above, measure 6 lbs to put in the hopper.
(2) Measure out a test strip. A longer strip is better for accuracy. It could be 50 ft. long, for example.
(3) Walk the length of the strip, spreading fertilizer as you go. When you have walked the 50 ft. strip one time, close the hopper and weigh the fertilizer that is left. Subtract the amount left in the hopper when you finished from the amount you started with and you will have the amount of fertilizer you used. For this example, let us say it was 2 lbs. used.
The spreader calibration formula is “amount of fertilizer used- times 1000- divided by the area of the test strip”.
If using a rotary spreader: Lets say your spreader makes a 10 ft. wide strip. Now, multiply 10 by the length of the test strip, which is 50ft. Your answer is 500ft. So, 500sq.ft. is the area of the test strip. The amount of fertilizer you used to cover the 500sq.ft. was 2lbs.
Here is what we have: 2 lbs X 1000 ÷ 500sq.ft. = 4 lbs per 1000/sq.ft.
If you needed 5 lbs per 1000/sq.ft. you will need to open the fertilizer openings more and run another test. With a little experience, spreader calibration can be performed very quickly and accurately.
For a drop spreader: Measure the spreader width opening. A two foot wide fertilizer strip times 50 ft. long test strip, equals 100 sq. ft. test area. Let's say the amount of fertilizer used to cover the 100 sq.ft. was 1/2 lb.
Here is what we know. On the 50ft test strip, the spreader dropped ½ pound of fertilizer X 1000 ÷ 100 sq.ft. test strip area.
It will look like ½ x 1000 ÷ 100 = 5 lbs per 1000/sq.ft.
That is the amount you needed to apply over 1000/sq.ft., so the spreader opening and spreader calibration is good.
Adjust the numbers in the formula for different fertilizer amounts needed per 1000/sq.ft.
Developing a Lawn Fertiliztion Program
Behind every beautiful lawn is a good lawn fertilization program. Whether it's a championship golf course or your home lawn, certain fundamentals always apply. Click here to begin planning your fertilization program.
Nitrogen Sources for a Green Lawn
Nitrogen is the most important element in lawn fertility. However, different types of fertilizers can deliver nitrogen differently. See what sources of nitrogen are available from organic to inorganic, as well as, when and how they are best used.
Soil Sample Collection and Testing
The first step in understanding what is in your soil is to take a soil sample. Click here to find out how to collect a soil sample that will deliver the best results.
Understanding The Soil Analysis Report
Understanding the soil analysis report can be difficult. Click here for an explanation of results commonly found of most reports.
Calculating Fertilizer Rates for Every Situation
One of the tough parts about fertilizing is knowing how much to put down. This page gives you simple mathematical formulas for determining the correct amounts in different situations.
Go from Spreader Calibration back to the Fertilization page


